Healthy Air App
User Guide
Need help navigating the Healthy Air App? Check out our app guide for step-by-step directions on how to set up and operate the AprilAire Healthy Air App.
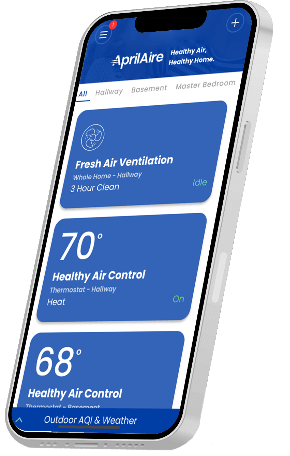
Overview
The home screen for the AprilAire Healthy Air App provides an overview of all your AprilAire devices and their operational status. From this screen, you can access the control screen for each device, as well as view the status of each location associated with the app on your phone. This screen also provides you with the latest air quality reading and weather forecast in your area.
Download Now:



- Search and install the AprilAire Healthy Air App from the App Store
- Open the app on your device.
- Tap Create Account.
- Enter a valid email address and choose a password for your AprilAire User Account and tap Create Account
- Fill in your personal information, including your ZIP or postal code for your new thermostat’s location and select a world time zone. This will ensure you have access to local weather data and that the time on your thermostat is correct.


You can now add air filters, water panels, and steam canisters into your account without needing to provision a connected equipment. Simply tap the + button in the upper right-hand corner of the selected Location screen, select the product you want to add or use your phone’s camera to scan the packages barcode, instantly adding the product into your app. Then follow the in-app instructions.
The app will let you know when it’s time to replace your consumable and you can repurchase directly from the app, including a subscription option so you never run out of fresh and clean media, ensuring optimal operation of equipment and the healthiest levels of clean indoor air possible.
This feature is available for Air Filters, Water Panels and Steam Canisters.

Thermostat
- After successfully created an account, select the + icon on the top right of your screen
- Select the S86 thermostat model.
- Follow the directions on the app to prepare the thermostat
- If you see the BLE icon on the screen of your thermostat, go to step 5.a, otherwise go to step 5.b
- Your thermostat model will pair with your phone using Wi-Fi connectivity. Follow the in app instructions to pair and input your Wi-Fi network information
- Your thermostat model will pair with your phone using Bluetooth connectivity. Follow the in app instructions to pair and input your Wi-Fi network information
- Once your thermostat is connected to the internet, select a Location and a Room per app instructions
- Congratulations! You have successfully registered your thermostat. Tap on the tile to open the thermostat control screen. You can now access and control your thermostat from your mobile device.


- After successfully created an account, select the + icon on the top right of your screen
- Select the thermostat model
- Follow the directions on the app to prepare the thermostat
- Your thermostat will pair with your phone using Wi-Fi connectivity. Follow the in app instructions to pair and input your Wi-Fi network information
- Once your thermostat is connected to the internet, select a Location and a Room per app instructions
- Congratulations! You have successfully registered your thermostat. Tap on the tile to open the thermostat control screen. You can now access and control your thermostat from your mobile device.
The Thermostat Screen allows you to view and adjust temperature and change fan mode.

To adjust temperature, tap the arrows above and below the heat icon (left) or cooling icon (right) located in the center of the screen.
Tap the Fan icon in the lower left-hand corner and select ON, AUTO, or CIRCULATE.
Tap the Mode icon, located to the immediate right of the Fan icon. Select HEATING, COOLING, AUTO CHANGEOVER, EMERGENCY HEAT, or OFF*
*These options will differ depending on your HVAC equipment.
- Set the desired hold temperature by tapping the arrows on the Temperature Control icon.
- Tap on Hold Until to set the temporary hold. Tap Done to save your settings or Cancel to discard any changes.
- When active, the hold setting will be communicated in a message beneath the temperature and fan status indicators.
Tap Heat Blast* to activate the setting. Heat Blast will turn solid red when activated.
*Only available in Heat or Emergency Heat Mode. Must be initially programmed on thermostat by installer.
- Tap the new Sensors icon on the Thermostat Home Page to view a list of all sensors connected to that device
- Indoor sensors will always lead with the controlling sensor in a highlighted color.
- Wireless sensors will include a battery level icon, and turn orange when there is an operational warning.
- Tap in the desire sensor to display Historical Sensor Data details


Each day has four events: Wake, Leave, Return, Sleep. Navigate between days at the top of the screen.
- Set the Time, Fan and Temperature for each event by tapping the attribute you wish to change.
- After setting the attributes for one day, they can be copied to other days by tapping Copy To. Tap the days you wish to copy the schedule to. A checkmark will appear next to those days. Then tap Save.
- To finish scheduling, set the attributes for the days that you did not “copy to.” In the above example, you would set the time, temperature and fan for Saturday and Sunday. If Sunday’s schedule is the same as Saturday’s, you can again simply use the “copy to” function after setting attributes for one of the days. Tap “Done” on the set schedule screen to save all settings.
- Tap the “X” in the upper left-hand corner of the screen to reset changes. All scheduled settings will revert back to original AprilAire recommendations. Reset is located at the bottom right of the screen when using IOS, and the top right when using an Android device.


- Tap the Chart icon at the top of thermostat, humidifier, dehumidifier control pages
- The Heating/Cooling Run Time chart can be access from the thermostat where the Humidifier and Dehumidifier run Times can be access from their respective control pages
- View the previous 24 hours, 7 days, or 30 days easily by switching between viewing options. You can also page through previous days, weeks, and months on demand


Humidifier
- Tap Humidifier on the home screen to access the humidifier screen.
- To control your humidifier’s status, tap On/Off.
- Tap + / – to set the desired level of humidity. Your humidifier will deliver the optimal amount of humidity based on this selection to protect your home from excess condensation or air that is too dry.
NOTE: These options will vary depending on your installed equipment.

- Tap Humidifier on the home screen to access the humidifier screen.
- To control your humidifier’s status, tap On/Off.
- Tap + / – to set the desired level of humidity.
Homeowners can be notified when it’s time to replace their connected humidifier’s Water Panel or Steam Canister and the app provides an easy and convenient way to purchase new ones. Just tap the replace media notification and follow the in-app instructions.
Homeowners can also add a Water Panel or Steam Canister directly in the app without needing a Wi-Fi Thermostat. Simply tap ‘Add a product’ and select the desired Water Panel or Steam Canister model.


- Tap the Chart icon at the top of thermostat, humidifier, dehumidifier control pages
- The Heating/Cooling Run Time chart can be access from the thermostat where the Humidifier and Dehumidifier run Times can be access from their respective control pages
- View the previous 24 hours, 7 days, or 30 days easily by switching between viewing options. You can also page through previous days, weeks, and months on demand
Dehumidifier
|
- Tap the Chart icon at the top of thermostat, humidifier, dehumidifier control pages
- The Heating/Cooling Run Time chart can be access from the thermostat where the Humidifier and Dehumidifier run Times can be access from their respective control pages
- View the previous 24 hours, 7 days, or 30 days easily by switching between viewing options. You can also page through previous days, weeks, and months on demand
Air Purity
Homeowners can be notified when it’s time to replace their air filter and the app provides an easy and convenient way to purchase new ones. Just tap the replace media notification and follow the in-app instructions.
Homeowners can also add an Air Filter directly in the app without needing a Wi-Fi Thermostat. Simply tap ‘Add a product’ and select the desired Air Filter model.


- To set the desired mode for your air purification equipment, tap Mode then select Auto, Constant Clean or Off.
- To activate a temporary event, tap 3 Hour or 24 Hour.
- The selected event icon will change to solid. To cancel the temporary event, tap the X.
- Tap Back to return to the device list.


Fresh Air Ventilation
- To set the desired mode for your air purification equipment, tap Mode then select Auto, Constant Clean or Off.
- To activate a temporary event, tap 3 Hour or 24 Hour.
- The selected event icon will change to solid. To cancel the temporary event, tap the X.
- Tap Back to return to the device list.

Settings
Enjoy a sleek, easy-on-the-eyes experience with our Dark Mode option.
- Set the Indoor Temperature and Indoor Humidity Limits.
- To turn an alert on, tap “Enable”.
- Tap “Save” to save settings.

- To adjust your Away settings, set “Heating and Cooling” set points and “Fan” mode.
- Tap “Done” to save your settings.

Vacation mode allows you to set a temporary hold on temperature and humidity at a location that you plan to leave for an extended period of time. For example, using vacation mode in conjunction with temperature and relative humidity alerts can provide added peace of mind. Your vacation property or home is monitored and protected in your absence from indoor climate damage such as frozen pipes, mold, mildew, flooring damage, and more.
- Tap “Vacation Mode” to bring up the vacation settings.
- Set return date/time temperature set points and fan mode.
- Tap “X” to discard your changes and return to the Settings screen.

To add a new device that is already active on your Wi-Fi network, tap the + button in the upper right-hand corner of the selected Location screen and follow the in-app instructions.
To remove a device, go to the Thermostat settings (gear icon on the upper right corner of the Thermostat screen) and select Forget Device. Press Yes to confirm its removal or No to cancel this action.

App Side Menu
The side menu is used to navigate to several of the app’s features. Access the side menu from any screen by tapping the 3-line menu button in the left-hand corner. Close the side menu by tapping any background area to the right of it.

Open the side menu by tapping the 3-line menu button and select Edit Location.
From here you can change the location name, ZIP/Postal code or world time zone. The location can also be removed from your user account. Note that you cannot remove a location that has devices assigned to it.
To edit any information, tap on the entry, make the changes and press Save when done. Press Back to discard any changes.

Enter your zip code and instantly be connected with AprilAire Healthy Air Professionals near you.
To edit your profile information, tap the 3-line menu icon in the upper left-hand corner of any Location screen and tap Edit Profile next to your name.
From here, you can change your name, phone number, address, preferred temperature scale, enable or disable push notifications and email notifications and change your password.

If you would like to update your password, tap Change Password. Enter your current password, new password with confirmation and tap Save. You can press any of the eye icons to show what you have typed to avoid typos.

Open the device’s Settings page and open “Device Sharing”. The user who provisioned the dvice is set as the “Device Manager”.
Click on the (+) to add the email address of another user’s account. The other user must have already set up their user account for this step to succeed.
Set the level of access being granted to the new user. Press “Save” when finished.

Aire Care provides AprilAire Thermostat App users with a network diagnostic solution that will allow instant analysis of our customers’ home network configuration and environment. Aire Care will not only identify the root cause of a customer’s Wi-Fi issue but also insight into how to resolve it, making troubleshooting quicker and easier.
The Aire Care self-diagnosis app is available 24 hours a day, 7 days a week – helping thermostat app users resolve their problems at any time. Simply go to the Support page in the side menu and click the AireCare link to download the Aire Care app and follow the steps to self-resolve.
Download Now: